How to Create a Simple Web Server Using Node.js

If you don't know about Node.js, you must read my article about what Node.js is by clicking here. If you know what Node.js is, please nevermind this.
Installation of Node.js and NPM
Before creating a server using Node.js, you must have already installed Node.js and NPM on your computer.
To ensure you have already installed Node.js and NPM, you need to run the following commands:
node -vnpm -v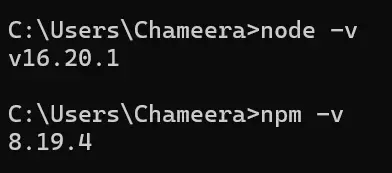
Initialization of a New Project
To initialize a new project, you must create a directory with your project name, for example, "myweb," and then run the following commands in your command prompt or terminal:
mkdir mywebcd mywebnpm init -yAfter running these commands, it will create a new file named "package.json" in your project directory. This file contains metadata about the project, including dependencies.
Installation of Express.js
To create a basic Node.js web server, you need to install Express.js in your project directory. You can install Express.js by using the following command:
npm i expressWhat is Express.js?
Express.js is an NPM package that is used to create a web server.
The Process of Creating a Web Server
First, you need to create a JavaScript (.js) file in your project directory.
Importing Express.js
After creating the JavaScript (.js) file, you need to import Express.js in your .js file. In my case, my file name is "index.js." Enter this code in the .js file to import Express.js:
const express = require('express');Creation of an Express Application
After importing Express.js, you need to create an Express application by following this code:
const app = express();Creating a Route
After following the above steps, you need to create a route to access your website from the client side. Follow this code to create a route. In this case, I'm using the "/home" route address. Enter this code:
app.get('/home', (req, res) => {
  res.send('Hello World!');
});
Now you have successfully created a web server, but we need one more step to access your website.
Starting the Web Server
Congratulations! It's time to run our Node.js web server. First, you need to choose a port to run the server; in my case, I'm using "3000". Follow this code to start the server:
const port = 3000;
app.listen(port, () => {
  console.log(`Server is running at http://localhost:${port}`);
});
Tip: This article contains only how to create a basic web server. If you need to learn more about how to create a web server using Node.js, please wait for more articles.


Trending